Installing cabinets is a task that requires precision, skill, and the right tools. The Viking Arm® Cabinet Installation tool is designed to streamline the process, providing everything you need for quick, precise, and safe installation of upper cabinets. This post will guide you through a professional installation process using this innovative system, highlighting tips for precision, safety, and efficiency.
The cabinet installation tool – Viking Arm®

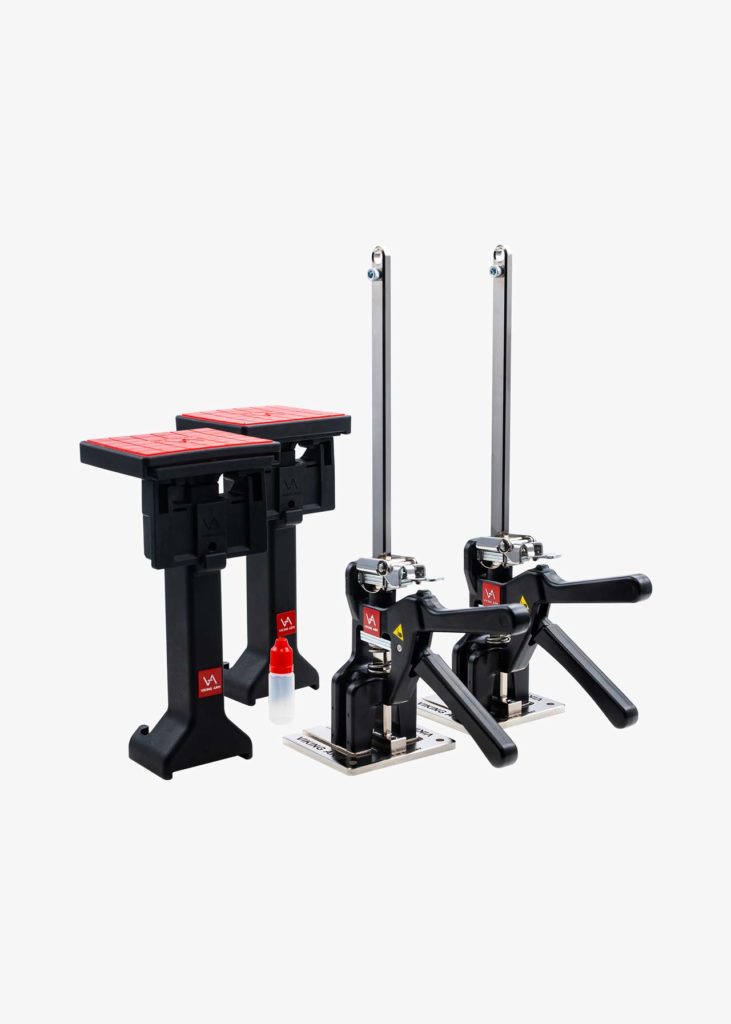
The cabinet installation system includes:
- 2 x Viking Arm: Known for its versatility, precision, and lifting power, each Viking Arm provides the support necessary during cabinet mounting.
- 2 x Cabinet Installation Kit (CIK): Each kit includes an extender that allows for the installation of cabinets up to 60.5 cm (23.8 inches) above the counter (higher if you place something under the base), a base pad to protect surfaces, and a lifting pad for object protection when not using the extender.
- Magnetic Spirit Level: A must-have for ensuring level installations, and enhancing your cabinets’ functionality and aesthetic appeal.
- Oil Bottle: Ready to be filled, this ensures smooth operation and maintenance of your tools.
- Tool Case: Compact and durable, measuring W437 mm x H379 mm x D160 mm with expertly crafted foam inserts for protection and organization. The total weight with tools included is 6.1 kg (13.5 lb).
For further details, visit the CABINET INSTALLATION SYSTEM / TOOL CASE product page.
Steps to installing cabinets with Viking Arm® – cabinet installation tool
1. Preparation
Begin by ensuring your workspace is clean and free of obstructions. Gather all necessary tools from your Cabinet Installation System
Tip: Before installation, assemble the cabinets and measure and mark where each cabinet will be placed. Use the magnetic spirit level to verify that your markings are level.
2. Setting Up the Viking Arm® with the Cabinet Installation Kit (CIK)
Remove the Base pad from the top of the CIK (slide it off) and slide it onto the base/feet of the Viking Arm. Remove the red pin holding the telescope extender in place. Lift the extender to remove the extra Lifting pad (you can leave it in place). Slide the CIK down over the hips of the Viking Arm. The opening on top of the CIK where the top of the shaft goes into shall be on the left side. Adjust the telescope extender to the preferred height and lock it by inserting the red pin through the holes.
Position the Viking Arm(s)® beneath the area where the cabinet will be installed. Adjust the placement and the height so the top of the CIK is close to the installation height. Note that the CIK shall NOT be in the back or the middle under the cabinet. To prevent the cabinet from tilting forward, the CIK shall be placed a little more to the front than the middle.
Tip: Double-check the alignment and placement of the arms before proceeding to ensure optimal stability.
3. Lifting and Positioning the Cabinets
Gently lift the cabinet and place it on top of the red non-slip top of the Cabinet Installation Kit. Just find the right sideway position at this point. Put the spirit level on the cabinet. Use the precision lifting and lowering function of the Viking Arm® to find the perfect height and level
4. Securing the cabinet
Once the cabinet is in position, proceed to secure it to the wall. Confirm alignment and levelness again before tightening screws or fasteners, utilizing the spirit level for accuracy.
5. Next cabinets – Super fast installation
Now that you have the approximate height and position already set on your Cabinet Installation Kit, the next installation goes very fast. Just move the CIK over to where the next cabinet will be installed. Lift the cabinet in place. Adjust. Secure.
5. Completing the installation
Perform a final check using the spirit level across all installed cabinets to ensure perfect alignment and that all units are secured properly.
Tip: Use the provided oil bottle to maintain your Viking Arm® in peak condition, ensuring smooth operation for future installations.
Safety and efficiency tips
- Precision: Always use the spirit level for every step, from marking to final alignment, ensuring a professional finish.
- Safety: Protect both the cabinets and your desk/flooring with the included pads, reducing the risk of scratches and damage.
- Speed: The Viking Arm® allows for one-person operations, significantly reducing installation time while maintaining precision and safety.
Conclusion
With the right tools and techniques, installing cabinets no longer needs to be an arduous task. The Viking Arm® Cabinet Installation tool offers everything required for professional-quality installations. By following the steps and tips, you will achieve precise, safe, and efficient results.
Invest in this powerful cabinet installation tool to simplify and improve the quality and efficiency of your projects. Explore more about this innovative solution on the product page.
Transform your approach to the cabinet installation and experience the streamlined process that the Viking Arm® makes possible.
