Window installation is a task that demands precision, strength, and meticulousness. Whether you’re a professional contractor or a DIY enthusiast, having the right tools can make a world of difference. Enter the Viking Arm®, an all-in-one tool that revolutionizes the window installation process by offering unmatched precision and simplicity. In this guide, we will walk you through how to effectively install windows using this versatile tool.
Introducing the Viking Arm® Tool
The Viking Arm® is a cutting-edge lifting and mounting device that has quickly become a favorite in the construction industry. Its remarkable lifting capacity of up to 150 kg (330 lbs) paired with its ability to provide millimeter precision makes it indispensable for installing windows.

Why choose the Viking Arm®?
- Precision: Offers fine-tuned adjustments with millimeter accuracy.
- Efficiency: Enables one-person operation, reducing the need for extra hands.
- Safety: Equipped with non-slip surfaces to protect both the tool and the objects being installed.
Preparing for Window Installation
Before diving into the installation, preparation is key. Gather your materials, including the Viking Arm®, and ensure that your workspace is organized and that the window opening is clean and free from debris.
Materials Needed:
- Viking Arm®
- New window
- Level
- Shims
- Screws and a power drill
- Caulking and weatherproofing materials
Tip: Measuring the window opening twice before installation can prevent unnecessary adjustments later.
Step-by-step window installation process
1. Positioning the window
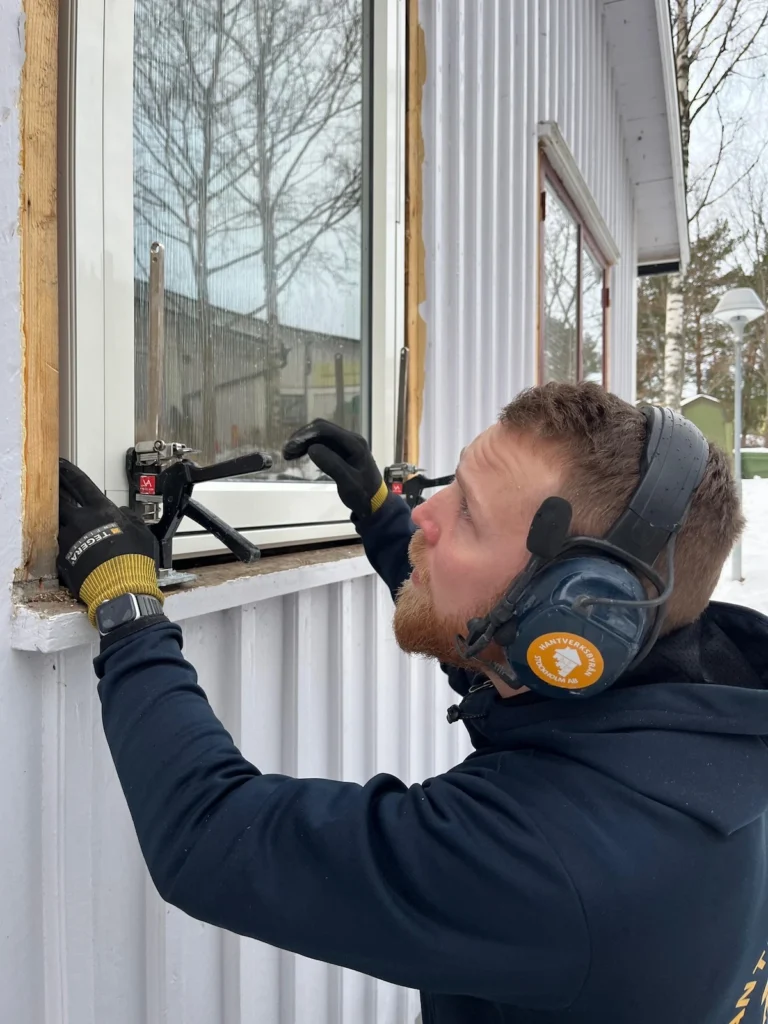
Positioning is critical in window installation, and the Viking Arm® simplifies this task considerably. Start by placing the window into the opening. If you’re working alone, the Viking Arm® will help support the weight of the window, allowing you to position it correctly without straining.
- Action: Place the Viking Arm® under the window and/or the side, adjusting it gently to elevate the frame precisely into the desired position.
2. Centering and leveling
Once the window is roughly positioned, you’ll need to center and level it accurately. Use the Viking Arm® to make fine adjustments, ensuring that all sides are equally balanced.
- Action: Check the leveling with a spirit level or laser and make micro-adjustments using the Viking Arm®. This step is crucial for the overall operation and aesthetic of the window.
3. Securing the window
With the window perfectly positioned and leveled, it’s time to secure it permanently. Insert shims on the sides to maintain alignment during the fastening process.
- Action: Use a power drill to screw the window into the frame. The Viking Arm® will hold the window steady, minimizing any potential movement or misalignment.
Tip: Ensure that screws are placed securely without over-tightening, which can warp the frame.
Finalizing the installation
Once the window is secured, ensure the following finishing touches are completed:
1. Insulating and sealing
Proper insulation will impact the window’s energy efficiency. Apply caulk around the perimeter of the window frame to seal any gaps from air and moisture.
- Action: Press caulking firmly into all crevices, ensuring a smooth, even finish.
2. Double-checking alignment
Do a final check to ensure that the window opens and closes smoothly without any obstructions. The initial precision provided by the Viking Arm® often ensures no further adjustments are necessary.
3. Clean-up and inspection
After installation, ensure the area is clean and inspect the window for any visible imperfections or misfits.
Tip: Take a moment to test the window. Check locks, handles, and any additional features to confirm they are functioning correctly.
Installing windows with the Viking Arm® showcases how modern tools can significantly enhance accuracy, safety, and efficiency in construction tasks. This tool transforms a potentially challenging task into a straightforward operation that can be completed confidently by both professionals and DIYers alike.
For more information on why the Viking Arm® is the definitive choice for window installations, and to explore further innovative solutions, visit the official Viking Arm® website.
By streamlining the process, minimizing the need for additional manpower, and ensuring precise results, the Viking Arm® stands out as a must-have tool in any toolkit, promising an elevated experience in your next window installation project.